0. 背景介绍
Sentry 是个较为庞大的监控系统, 本文第一节: 旨在介绍核心知识: Issue; 第二节: 使用 code 展示 sentry sdk 的使用方式和技巧, 这些技巧涉及普通应用程序和 lambda, 监控内容上以监控异常为主性能为辅; 第三节: 介绍 sentry 的消息通知方式, 默认是邮件, 本文介绍和 slack 进行结合. 三个章节之后, 开发者可快速了解并实现一套完整的应用程序异常/性能捕获和通知提醒的流程.
1. Issue
Issue: 是一类 bug 或者 exception(异常), 使用 fingerprint(指纹)定义, 一个 issue 下有一个或者多个 event(事件), 简单起见可以直接理解为 github 的 issue
fingerprin: t 定义 event 的一组特征 具体特征有
- events type(事件类型): 可以理解为异常类, 例如: Error/TypeError/BadRequestException
- value(事件值): 可以理解为异常的 message
- exception stack trace(异常栈跟踪): 这个栈是 sentry 自己的概念
- In-app exception stack trace(应用异常栈跟踪): 这个应用程序本身异常堆栈但是被 sentry 包装了, 可以理解为异常栈
总结
指纹可以被开发者设置, 如果不设置异常的话, 会对比以上特征
issue 分类
error issue: 因平台而不同, 通常的代码异常属于该类型, 比如 nodejs 的一些异常
- exception
- uncaught exceptions
- unhandled rejections
performance issue: 一组业务的性能问题, 于 error issue 相比, 该类型 issue 通过 trace+metric 方式实现, sentry 支持几种不同自由度的性能分析的实现方式:
- 自动测量: sentry sdk 开箱即用的特性, 默认开启
- 自定义测量: 客户端和分析平台还是 sentry, 但是可以自定义 metric
- OpenTelemetry: 客户端是 sentry, 分析平台是第三方, 即把 sentry 的 metric 发送到第三方
除了监控应用程序性能, sentry 也支持数据性能监控, 该方式也是开箱即用, 如下:
1
2
3
4
5
6
7
8
9
10
11
12
13
14
15
16
17
18
19
const Sentry = require("@sentry/node");
const mongodb = require("mongodb");
// 自动检测
Sentry.init({
dsn: "https://xxxx@oyyyy.ingest.sentry.io/zzzz",
integrations: [
...Sentry.autoDiscoverNodePerformanceMonitoringIntegrations(),
],
});
// 指定
Sentry.init({
dsn: "https://xxxx@oyyyy.ingest.sentry.io/zzzz",
integrations: [
new Sentry.Integrations.Mongo({
useMongoose: true, // Default: false
}),
],
});
本文重点是 error issue, 性能 issue 仅采用默认开箱即用的方式
tag(标签): 标签是一组 key-value 值, 可以在
captureException的时候自定义,例如1
2
3
4
5
6
7
8
9
10
11
12
13
14
15
16
17
18
19
20
21
22
23
24
25
26
27
28
29
30
31
32
33
34
35
36
37
38
39
40
41
42
43import {
Injectable,
NestInterceptor,
ExecutionContext,
CallHandler,
} from "@nestjs/common";
import { Observable } from "rxjs";
import { tap } from "rxjs/operators";
import * as Sentry from "@sentry/serverless";
import { Response } from "express";
()
export class SentryInterceptor implements NestInterceptor {
intercept(context: ExecutionContext, next: CallHandler): Observable<any> {
return next.handle().pipe(
tap(null, (exception) => {
const functionName = context.getHandler().name;
const className = context.getClass().name;
const cxt = context.switchToHttp();
const res = cxt.getResponse<Response>();
const captureContext = {
extra: {
request: {
method: res.req.method,
params: res.req.params,
query: res.req.query,
body: res.req.body,
url: res.req.url,
},
response: {
statusCode: res.statusCode,
},
},
tags: {
functionName,
className,
},
};
Sentry.captureException(exception, captureContext);
})
);
}
}状态
状态 描述 unresolved 未被解决 resolved 已解决 unassigned 未分配给某人负责解决 assigned 已分配 ignored 已忽略 deleted 已删除 删除后控制台看到
处以上状态外 issue 还有linked和unlinked的状态, 这个状态和 Github 有关, 指的是关联到 Github Issue.
- Event(事件): sentry 每捕获和发送一个异常就是一个事件, 同一类型的事件以
issue的方式呈现
2. SDK
因为个人采用 nodejs 进行开发, 所以 SDK 上介绍两种 nodejs sentry 的 sdk: @sentry/node和**@sentry/serverless**.
2.1 @sentry/node
默认集成以下插件
1
2
3
4
5
6
7
8
9
10
11
12
13
14
15
16
17
18
19
export const defaultIntegrations = [
// Common
new CoreIntegrations.InboundFilters(),
new CoreIntegrations.FunctionToString(),
// Native Wrappers
new Console(),
new Http(),
// Global Handlers
new OnUncaughtException(),
new OnUnhandledRejection(),
// Event Info
new ContextLines(),
new LocalVariables(),
new Context(),
new Modules(),
new RequestData(),
// Misc
new LinkedErrors(),
];初始化代码如下:
1
2
3
4
5
6
7
8
9
10
11
12
13
import * as Sentry from "@sentry/node";
Sentry.init({
dsn: "https://xxxx@oyyyy.ingest.sentry.io/zzzz",
integrations: [
// Automatically instrument Node.js libraries and frameworks
...Sentry.autoDiscoverNodePerformanceMonitoringIntegrations(),
],
release: "research",
// Set tracesSampleRate to 1.0 to capture 100%
// of transactions for performance monitoring.
// We recommend adjusting this value in production
tracesSampleRate: 1.0,
});其他
2.2 @sentry/serverless
对@sentry/node 的包装, 针对 lambda 特别提供, 具体使用如下
初始化
1
2
3
4
5
6
7
8
9
10
11
import * as Sentry from '@sentry/serverless'
Sentry.AWSLambda.init({
dsn: 'https://xxxx@oyyyy.ingest.sentry.io/zzzz'
release: 'research',
integrations: [new CaptureConsole()], // 捕获console
// Set tracesSampleRate to 1.0 to capture 100%
tracesSampleRate: 1.0,
attachStacktrace: true,
environment: process.env.ENV_NAME || 'unknown',
})注意
integrations 配置不影响默认集成, 默认集成列表在 defaultIntegrations 属性配置, 不配置默认采用@sentry/node 默认集成插件handler 处理
1
2
3
4
5
export const handler = Sentry.AWSLambda.wrapHandler(
(event, context, callback) => {
throw new Error("oh, hello there!");
}
);
2.3 SDK 使用技巧
-
- environment: 同一套代码会运行在不同的环境下, 每个环境都会发送事件, 可以使用
environment区分环 - release: 每个环境会迭代不同的版本使用
release区分版本 - tracesSampleRate: 设置采样率, 监控很重要但是也不能影响业务逻辑, 一定程度的丢失采样是可以接受的, 另外发送采样也是影响性能的, 所以开发者可以权衡后设置采样率
1
2
3
4
5
6
7
8
import * as Sentry from '@sentry/serverless'
Sentry.AWSLambda.init({
dsn: 'https://xxxx@oyyyy.ingest.sentry.io/zzzz'
release: 'research',
tracesSampleRate: 1.0, // Set tracesSampleRate to 1.0 to capture 100%
environment: process.env.ENV_NAME || 'unknown',
}) - environment: 同一套代码会运行在不同的环境下, 每个环境都会发送事件, 可以使用
捕获 console
1
2
3
4
5
6
7
8
9
10
11
12
13
import { CaptureConsole } from '@sentry/integrations'
import * as Sentry from '@sentry/serverless'
Sentry.AWSLambda.init({
dsn: 'https://xxxx@oyyyy.ingest.sentry.io/zzzz'
release: 'research',
integrations: [new CaptureConsole()],
// Set tracesSampleRate to 1.0 to capture 100%
tracesSampleRate: 1.0,
attachStacktrace: true,
environment: process.env.ENV_NAME || 'unknown',
})注意
integrations 配置不影响默认集成, 默认集成列表在 defaultIntegrations 属性配置, 不配置默认采用@sentry/node 默认集成插件捕获 try-catch
1
2
3
4
5
try {
throw new Error("try catch error");
} catch (err) {
Sentry.AWSLambda.captureException(err);
}中间件捕获
依赖
captureException方法, 参考1. Issue中标签的例子中的SentryInterceptor的拦截器的设计提交异常额外信息
依赖
captureException方法, 参考1. Issue中标签的例子中的SentryInterceptor的拦截器中L17的定义自定义异常标签
依赖
captureException方法, 参考1. Issue中标签的例子中的SentryInterceptor的拦截器中L29的定义自定义上下文信息
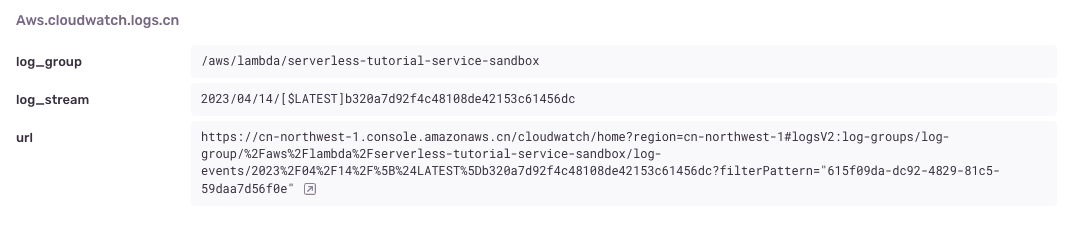
在 sentry 控制台可以看到 issue 的详细信息, 在 lambda 中还有非常有用的上下文信息, 这里以 lambda 中 cloudwatch 的链接为例, 在 sentry 源码中 cloudwatch 的地址域名是写死的, 我们可以使用
Sentry.AWSLambda.configureScope定义自己的上下文, 代码如下:1
2
3
4
5
6
7
8
9
10
11
12
13
14
15
16
17
18
19
20
21
22export const handler = Sentry.AWSLambda.wrapHandler(
(event, context, callback) => {
Sentry.AWSLambda.configureScope((scope) => {
scope.setContext("aws.cloudwatch.logs.cn", {
log_group: context.logGroupName,
log_stream: context.logStreamName,
url: `https://${
process.env.AWS_REGION.startsWith("cn-")
? `${process.env.AWS_REGION}.console.amazonaws.cn`
: "console.aws.amazon.com"
}/cloudwatch/home?region=${
process.env.AWS_REGION
}#logsV2:log-groups/log-group/${encodeURIComponent(
context.logGroupName
)}/log-events/${encodeURIComponent(
context.logStreamName
)}?filterPattern="${context.awsRequestId}"`,
});
});
throw new Error("oh, hello there!");
}
);效果如下:
3. 警报通知
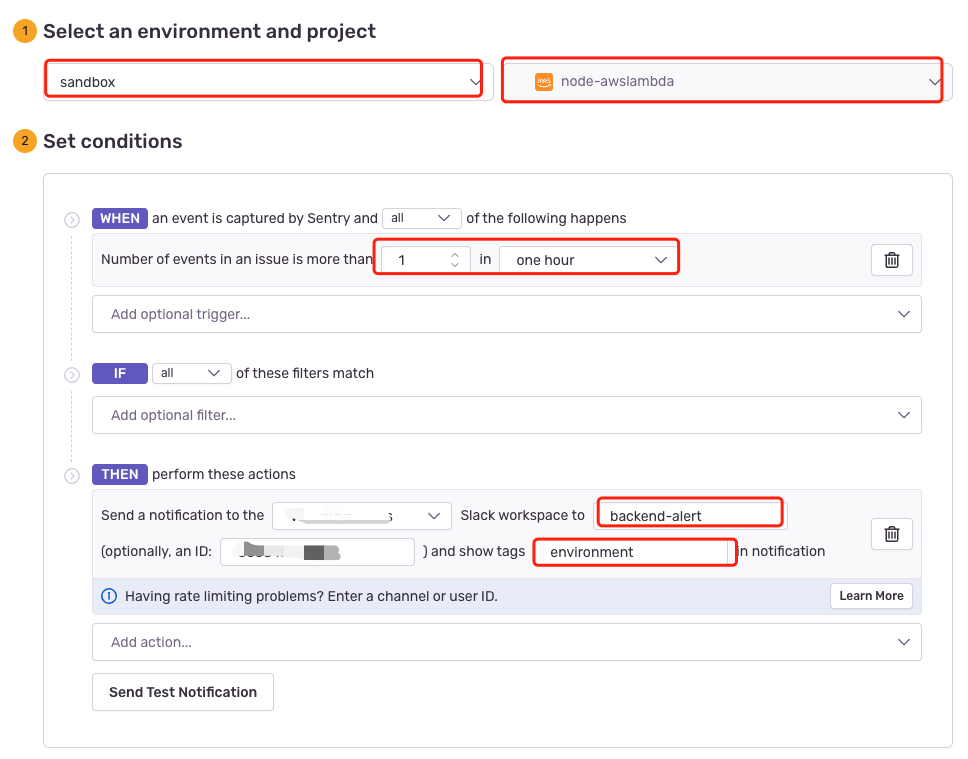
sentry 的通知有两类: issue 警报和 metric 警报, 本文主要介绍 issue 警报, 用户故事是: 配置一个针对 sandbox 环境的警报, 当 1 小时内有 issue 中有新增超过 1 的事件时就发送警报, 发送方式是 slack. 具体做法如下:
集成 Slack
登录进入控制台->
Settings->Integrations->Slack->Add WorkSpace创建警报: 参考文档: https://docs.sentry.io/product/alerts/create-alerts/
- 选择项目和环境
- 项目: 使用 sentry 捕获异常发送的哪个项目, 项目和应用程序对应
- 环境: 在 sentry init 的时候配置了
environment, 这里指的是通知应用的环境可以选择全部或者某个一项目, 按照用户故事这里选择 sandbox
- 设置条件
- WHEN(设置何时触发条件):
- 状态改变: 指的是 issue 的状态发生改变, 例如有新的 Issue 产生或者
- 频率改变: 指的是某个时间阶段 issue 的 event 数量变化, 按照用户故事本文使用该种触发条件
- IF(过滤): 设置过滤, 可以保持默认即不做过滤
- THEN(行为): 通知行为
- 发送通知到: 选择 Slack 上自己的组织
- Slack worksapce: workspace 类似群组, 这路需要一个组织内 public 的群组, 当然群组需要提前创建好, 例如: #backend-alert
- 在通知中显示 tag: 这个对看通知的人很有用, 这里的 tag 是 tag 的名字, 可以从 Issue 详情页面看到, 这里填写: sandbox
- WHEN(设置何时触发条件):
- 添加消息 Owner: owner 的名字自定义, 这个名字会被显示在消息中, 点击这个名字可跳转到警告详情页面
- 选择项目和环境
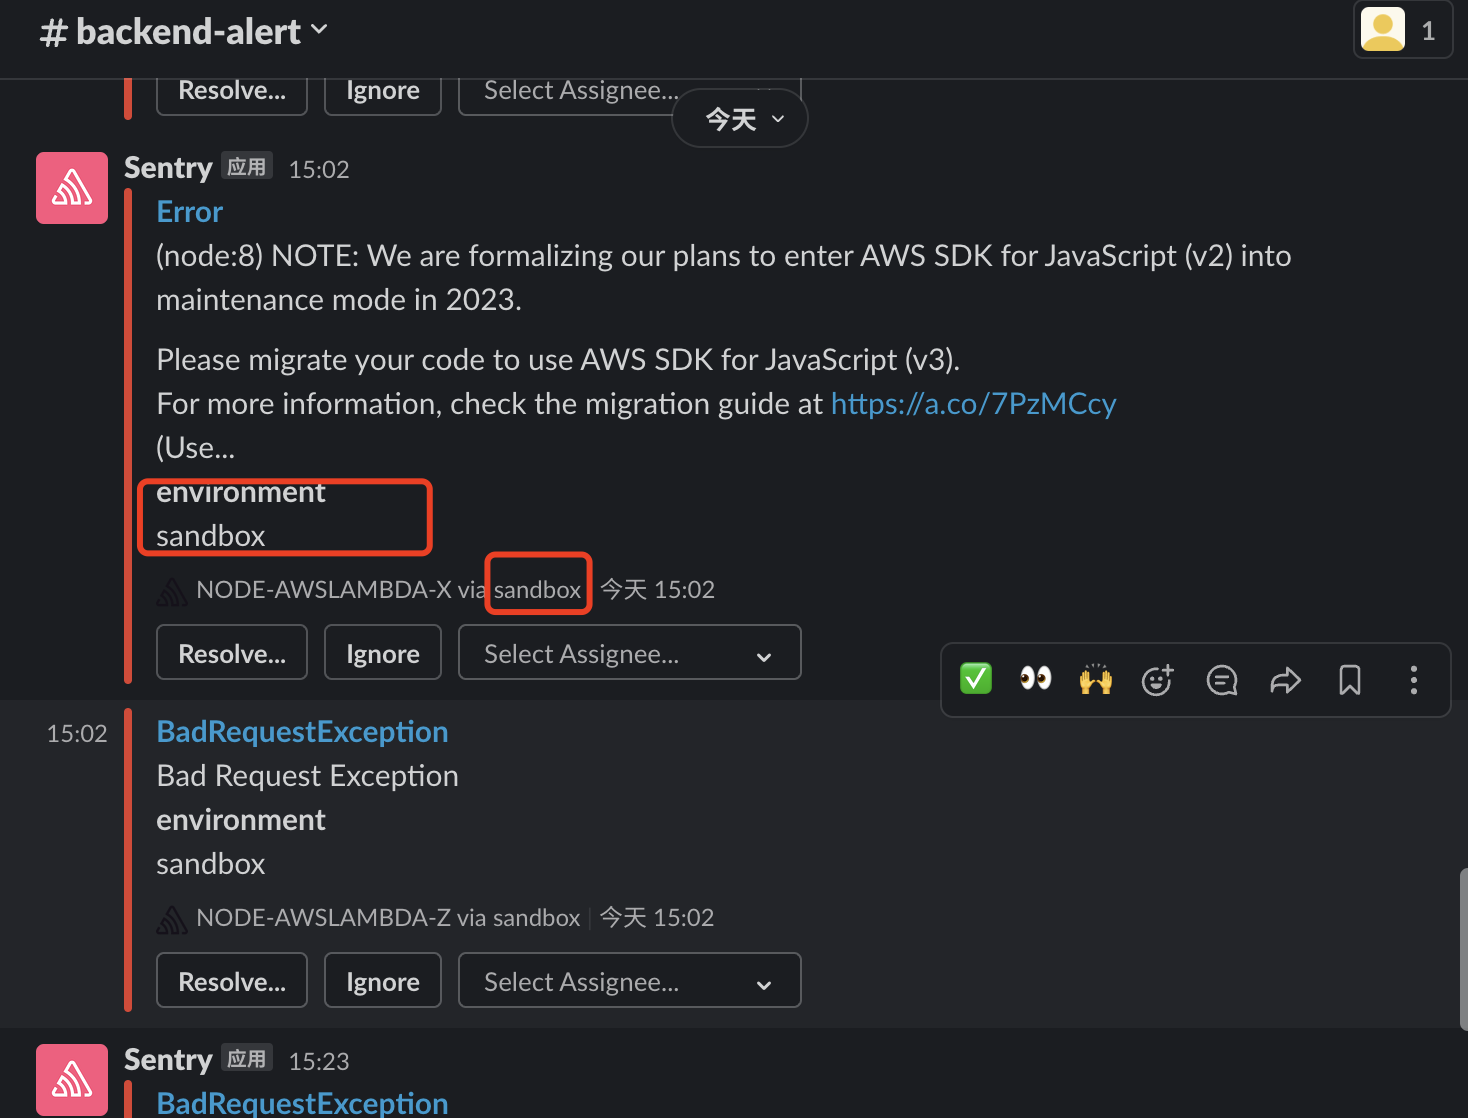
发送测试通知: 在配置好后可以发送测试通知, 检查是否配置有误, 这个测试通知无法应用真是项目 Issue 中的信息, 例如
environment标签, 仅是测试是否联通警报通知测试结果
- 警报配置结果
- 通知结果
4. 开发者免费套餐限制
- 最多只能注册并使用一个组织
- 最多只能创建一个项目
- 最多只能在一个项目中存储 5 万个事件(错误或异常
- 事件存储时间最长为 30 天
- 不提供高级功能,如 SSO(单点登录)、多因素身份验证等
- 不提供 24x7 技术支持
- 最多只能创建 10 个警报规则
- 每分钟最多只能发送一次警报通知。
- 只支持邮件通知方式,不支持集成其他第三方应用或通知渠道
5. 自定义 Slack 通知
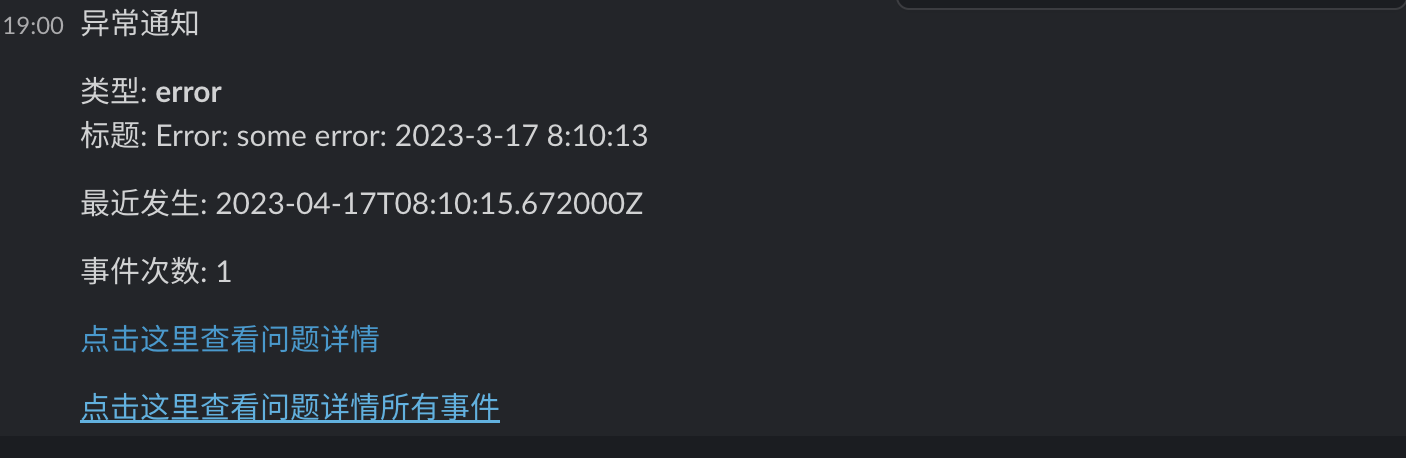
自定义的通知是因为根据上面第 4 节, 开发者免费版本是无第三通知集成了, 这里提供一个实验性的typecript脚本, 演示如何通过访问 Sentry API 和 Slack Webhook 进行通知, 更复杂的业务代码可根据这个 demo 继续修改和演进.
在代码生效前需要一些预先准备:
- 创建 Slack App, 获取 Webhook 地址: 该步骤很简单, 类似于创建一个群, 群里加入一个机器人, 假设我们的群是: devops; webhook url 通过环境变量
SLACK_HOOK传入程序 - 创建一个 Stack 项目, 并触发一些 Issue: 略
- 创建 Stack Auth Token:
Users Settings->Auth Token->Create New Token, 至少设置project:read, auth token 通过环境变量SENTRY_TOKEN传入程序
示例程序如下:
1 | import axios from 'axios' |
上面代码中有一些链接, 每个链接都是相关行代码的文档引用, 可以查看文档更好的自定义代码
示例消息如下: